Procedure Inspector
The Inspector panel in the Procedure Editor is context-sensitive. Different information is shown depending on what is selected in the graph.
You can also open the Procedure Inspector via the menu WEAVR > Procedures > Procedure Inspector.
Inspector Value Types
Fields in the Inspector support multiple input modes. The following value types are available:
Optional Value

These properties can be enabled or disabled by a checkbox on their left. When enabled, the value is used; when disabled, the value cannot be edited and at runtime it is skipped.
Animated Value

These properties are animated according to their target values during the specified time (duration). To enable the animation, select the chronometer toggle. The duration specifies how much time the transition takes for the property to reach its target value. The curve describes how to reach the target value. The Revert button, when available and if enabled, animates the property to its original value when exiting the node.
Multilanguage Value
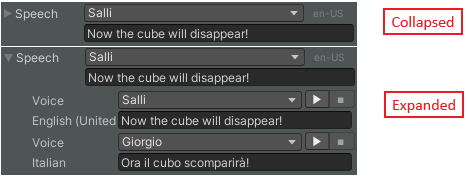
These properties can have different values per language. The arrow on the left is for expanding/collapsing the property. When collapsed, the property shows its value in the currently set language (the language id can be seen on the right side). When expanded, all language values can be seen.
Node Inspector
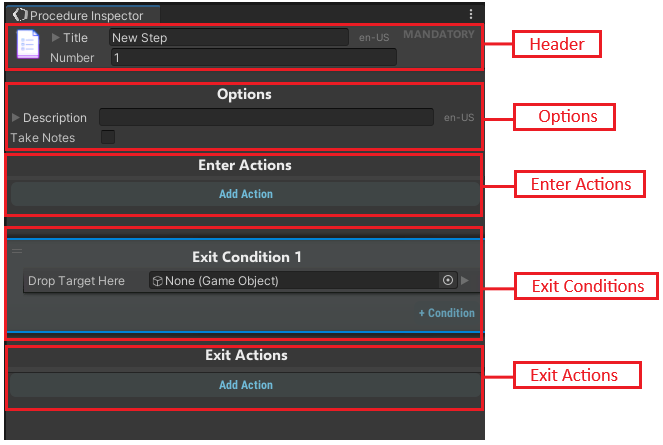
A newly created node, by default, has the following inspector. The node sections are:
| Section | Description |
|---|---|
| Header | Consists of the step number, the title of the node, and, in a VT procedure, the MANDATORY toggle to make the step compulsory or not. |
| Options | Edit the description of the procedure step and enables the ability to take notes during this step. |
| Enter Actions | The list of actions which are executed when the node is reached. |
| Exit Conditions | Condition(s) that are used to exit the current step. |
| Exit Actions | The list of actions which are executed right after any of the exit conditions are evaluated to true. |
Actions Inspector

An action is the smallest element which can be executed by the system. It is defined in a context and can live only in a context. A context can be anything from a node to a transition. The context defines a boundary where execution elements, such as an action or a condition, can run and exchange data.
An action has the following elements:
| Element | Description |
|---|---|
| Drag Handle | Move the action up and down the list. |
| Network | Whether the action is applied locally or globally (across network). |
| Action's Body | Properties of an action that are available for a modification. |
| Add Action | Adds a new action after the current action. |
| Action's Title | Type of the action. |
| Revert | When enabled, reverses the changes to this action on exiting the context (Node, Transition, etc.). |
| Async | When enabled, the action is executed asynchronously (in parallel with other actions). |
| Execution Modes | Supported execution modes for this action. |
| Remove Action | Delete the action from its context (Node, Transition, etc.). |
| Make Variable | Make a variable out of this target. |
| Preview | Previews the execution of the action. Preview bars differ for every action. |
Actions are executed according to their specified execution modes. If you define the same execution mode for the action and the procedure, the action will be executed.
You can move actions around the list (even from Enter Actions to Exit Actions) and copy them inside the same or diverse types of contexts.
You can quickly replace actions with other actions that belong to the same group. To do that, right-click the action Type, and then select the required action.

Conditions Inspector
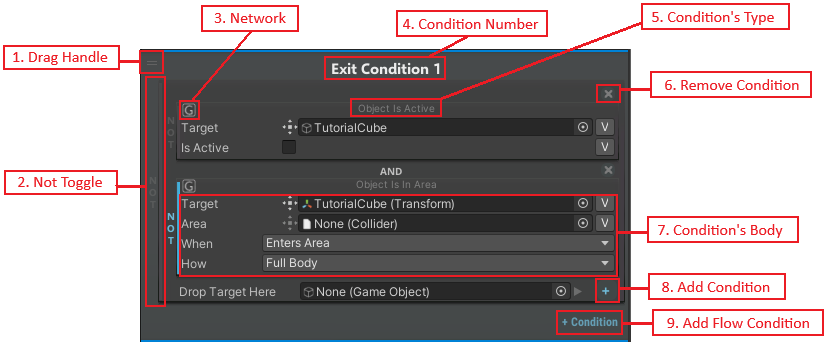
A condition is the smallest evaluation element of the system which is used to trigger the navigation throughout the procedure. A condition usually needs to be evaluated to true to trigger a navigation event. Conditions can be combined to get more complex logic expressions.
Every node has a set of topmost conditions in an OR expression with each child having a transition to other nodes. Each child starts with an AND expression where its children can be any type of condition (e.g., AND expression, OR expression, etc.).
Conditions can be moved and copied inside the same context, as well as between contexts. Every condition can be negated by using the NOT toggle on the left of each condition.
A condition has the following elements:
| Element | Description |
|---|---|
| Drag Handle | Moves the condition up and down the list. |
| NOT Toggle | If selected, negates the condition. All conditions at any depth can be negated. However, only the topmost negated conditions are shown in Graph View. |
| Network | Whether the condition is applied locally or globally (across network). |
| Condition Number | Order number of the condition to be evaluated. |
| Condition Type | Type of the condition. Implicit conditions do not show their types. |
| Remove Condition | Removes the condition. |
| Condition's Body | The properties of conditions. Each type of condition has its own body. |
| Add Condition | Adds a sibling condition to the condition immediately before. |
| Add Flow Condition | Adds a topmost condition (in the OR expression) with its own transition. |
Transition Inspector
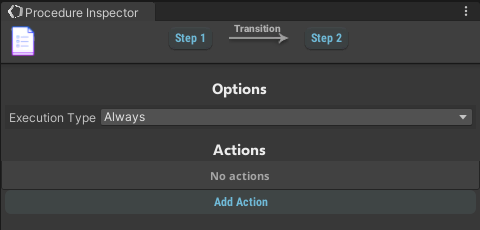
The Transition inspector consists of a header and a body. Its header contains the buttons to reach the connecting nodes, while its body contains the list of actions to be executed when following the path of the transition.
| Field | Description |
|---|---|
| Execution Type | The way this transition will be executed: Always, Same Execution Flow, or Only Once. |
Hub Node Inspector
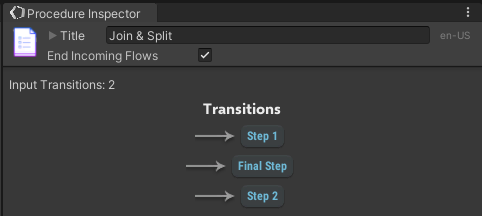
The Hub Node inspector consists of a header and a body. The header contains the title of the node, while the body contains the number of input connections and links (both transition and node) to output transitions.
Super Step Inspector
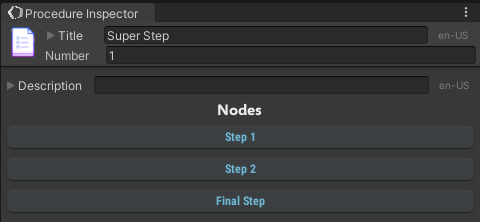
The Super Step Inspector consists of a header and a body. The header contains the title (supports multilanguage) and the number, while the body contains the description (supports multilanguage) and the list of nodes. To display the Super Step Inspector, click any node inside the group.
Event Node Inspector
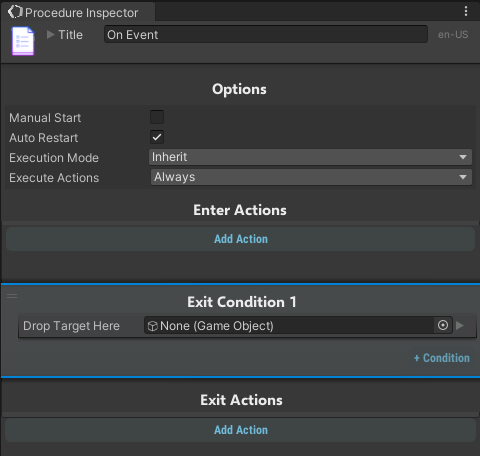
The Event Node inspector consists of a header and a body. The header contains the title of the node, while the body contains options about this node and enter/exit actions as well as Exit Conditions.
The options are:
| Option | Description |
|---|---|
| Manual Start | If disabled the event will be triggered at the start of the procedure, else you'll need to call it inside a procedure node. |
| Auto Restart | The flow will be restarted at the end of the event flow. |
| Execution Mode | Whether this node will be used in the current execution mode or in a specific one. |
| Execute Actions | How and when to execute the actions in this node. |
Selection Node Inspector
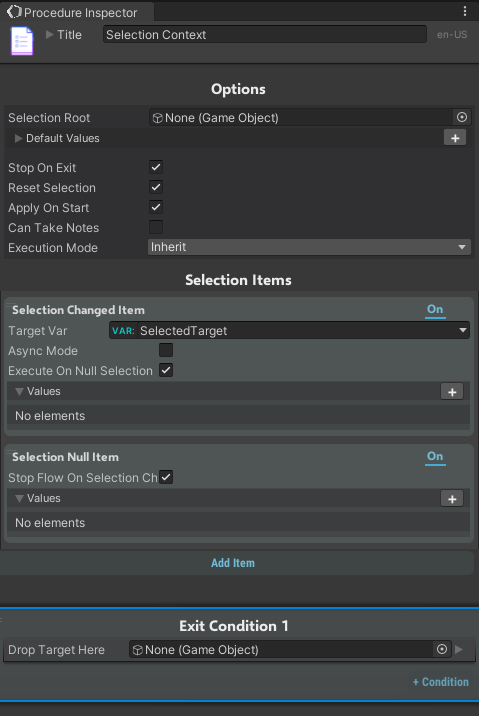
The selection node inspector consists of three main sections: Options, Selection Items and Exit Condition. The last one is the classic exit condition inspector; the other parts are specific of this node.
Options
| Option | Description |
|---|---|
| Selection Root | If the items that you want to select are parts of a "bigger" object (an engine for example), you should put the parent GameObject here. |
| Stop on Exit | Whether to stop the children flows when the exit condition is evaluated to true. |
| Reset Selection | Whether to reset the selection on exit. |
| Apply on Start | Whether to apply the selection logic when this node is reached or not. |
| Can Take Notes | If enabled the user will be able to add/edit notes for this step. |
| Execution Mode | Whether this node will be used in the current execution mode or in a specific one. |
Selection Items
The Selection Items section manages the items that you want to select or the events that will be triggered when something is selected or not.
Selection Changed Item Action
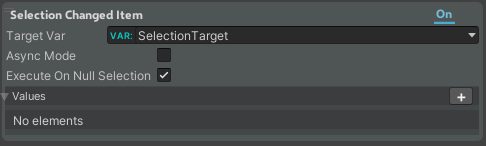
| Property | Function |
|---|---|
| Target Var | The variable in which you want to save your selection. |
| Async Mode | Enable this to make the flow asynchronous (i.e., start two different flows after the event). |
| Execute on Null Selection | Whether or not to perform selection changed actions even when nothing is selected. |
| Values | List of the object that you want to set when this event is triggered. |
Selection Null Item Action

| Property | Function |
|---|---|
| Stop Flow On Selection Changed | Stops this flow when the selection changes. |
| Values | List of the object that you want to set when this event is triggered. |
To add a new item to select, click on the Add Item button.
Add Item Action
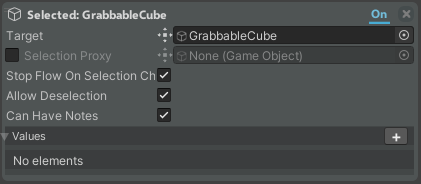
| Property | Function |
|---|---|
| Target | The object that you want to select. |
| Selection Proxy | [Optional] If enabled and set, you can use this object as a proxy to select your target object. You need to add to your proxy object the Selection Proxy component. |
| Stop Flow On Selection Changed | Stops this flow when the selection changes. |
| Allow Deselection | Whether this object can be deselected. |
| Can Have Notes | When selecting this object, the user can take notes. |
| Values | List of the object that you want to set when this object is selected. |
Selection Proxy
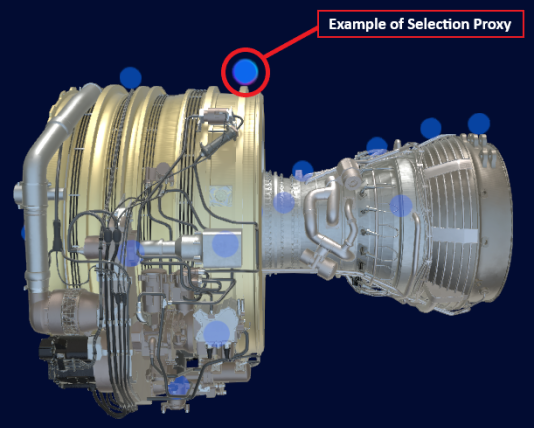
The Selection Proxy component allows you to use a GameObject in the scene as a selection proxy. Add the Selection Proxy component to your object to use it as a proxy.