Your First Procedure
Now that you've learned how to create a procedure and become familiar with its editor, let's try creating a simple one. Don't worry if some terms or elements are not clear to you, they will be dealt with in detail in the next sections. The goal of this tutorial will be to create a two-step procedure to change the color of an object within the scene.
Step 1 — Setup the Scene
First, let's set up the scene:
- Create a new empty scene. Go to File > New Scene, select the Basic one and click Create.
- Add a Plane to your scene.
- Setup the WEAVR Scene.
- Add a Cube to your scene. Go to: GameObject > 3D Object > Cube.
- Move the cube around the scene so that it is visible from the camera. Use the Game window to see where the object will be placed once the application is started.
After completing these steps, the Game window and the Hierarchy window should look like this:

In the Hierarchy window you will find all the WEAVR objects that are automatically added with the scene setup, some objects added by Unity in the scene creation (lights, for example) and your cube.
Step 2 — Create the Procedure
Now that your scene is ready, create a new procedure. Follow the steps indicated in the dedicated paragraph and create a VT Procedure, which has all 3 execution modes, with the languages you prefer.
As previously described, a procedure is made up of various steps, each step is represented within the graph by a node. To add a node within the procedure, right-click inside the Procedure Editor window and click on Create Node.
If you click on the node that you've just created, a new window will pop up. The Procedure Inspector gives you all the information about the node.

Step 3 — Configure the First Node
We want to change the color of the cube inside the scene. To do that we need to add some actions to our first node. As you can see from the image above, the Procedure Inspector is divided into various sections; to add a new action, click on the Add Action button of the Enter Actions section and search for the Set Color and Texture action.
Set the action as follows:
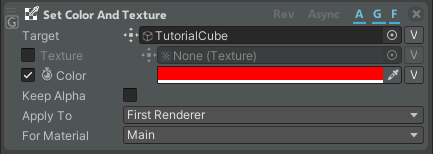
You can drag and drop your cube from the Hierarchy window to the Target field. Disable the texture field and enable the color one: choose a color you like and remember to set the alpha parameter of the color to the maximum value (otherwise the cube will be transparent).
Now, set the Execution mode to Guided, click on the Test button inside the Procedure Toolbar and then Play. If you have set the action correctly, the cube inside your Game Window should have turned red.
Let's make the procedure a little more complicated. Let's try adding a voice that introduces the step and a pause before the cube turns red. Before making any changes to the graph, exit Unity's Play mode by clicking on the appropriate button again.
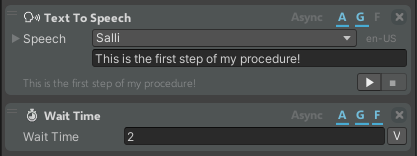
Now add the following actions to your node:
- Text to Speech
- Wait Time
Set them as follows:
Step 4 — Configure the Second Node
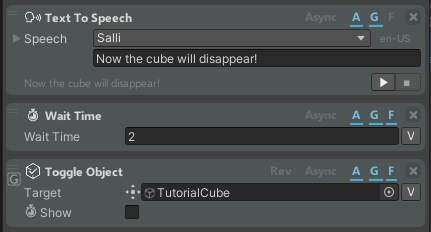
Create a second node and add these actions:
- Text to Speech
- Wait Time
- Toggle Object
Set them as follows:
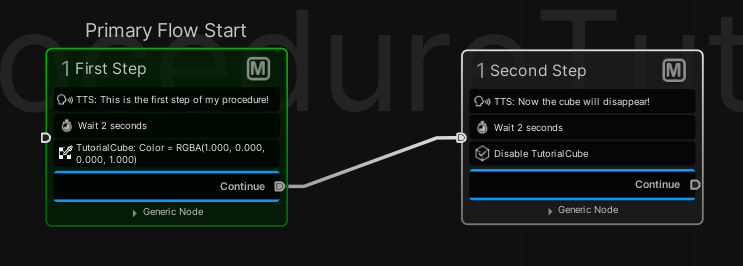
Now connect the two nodes. The graph should look like this:
If, for any reason, the procedure does not seem to work correctly, press the Reset button in the Procedure Toolbar to completely reset the steps (you will not lose the configuration of your actions).
To try the procedure, activate the Test button (if it was not already enabled), put the execution mode on Guided and go to Play mode.
Congratulations! You've created your first procedure. This is just a quite simple example of what you can do with the WEAVR Procedure editor: thanks to the available actions and conditions, you will be able to customize and make your procedure more complex. Furthermore, using the WEAVR components described above, you can interact with the objects in the scene and make your procedure much more immersive.
In the following sections you'll learn in detail about all the available actions, how to use a condition, the several types of nodes and how they are structured, and how to use the features of the Procedure Graph toolbar.