Interactions
Object behaviors are components that allow an object to behave in a specific way. These behaviors use the Unity Physics module to make interactions more natural, especially in a VR environment. They have two modes: Normal and Expert (Debug is for developers only). You can activate the Expert Mode by checking the toggle in the right corner of the component you are using; the expert fields will be highlighted in blue, the debug ones in yellow. The expert mode allows you to modify special properties of the component, for a more precise interaction. The green Interactable button makes the component interactable or not.
The Interactions components require a Rigidbody and a Collider to work properly.
The following components are documented in this section: WEAVR Object · Interaction Point · Connectable · Executable · Door · Door Lock · Push Button · Switch · Knob · Screwable
Stateful Behaviors

In some interactions like a Door or a Push Button, you will find so-called "States". States identify a certain position/rotation of the GameObject. Taking a Door as an example, we have two states: the OPEN state which represents the position/rotation of the open door, and the CLOSED state which represents the position/rotation of the closed door. For the door to work properly we need to set these two states. In the case of a door or a push button we will only have two states, but in the case of a switch we could have more than 2 states. The state has a Normal and an Expert mode; the green highlighted state is the current one.
| Property | Function |
|---|---|
| Name | The state's name ("Closed" in the picture above) |
| (position/rotation button) | Change the object's position/rotation according to the ones saved in this state |
| (save button) | Save the position/rotation of this state |
| Stable | If enabled, the object will hold the position once reached |
| Events | Enable Unity Events |
| Reset Timer | If NOT stable, indicates how long it takes for the object to return to the default state |
| On Enter / Exit Audio Clip | Audio Clip |
| On State Enter / Exit / Hold | Unity Events |
WEAVR Object
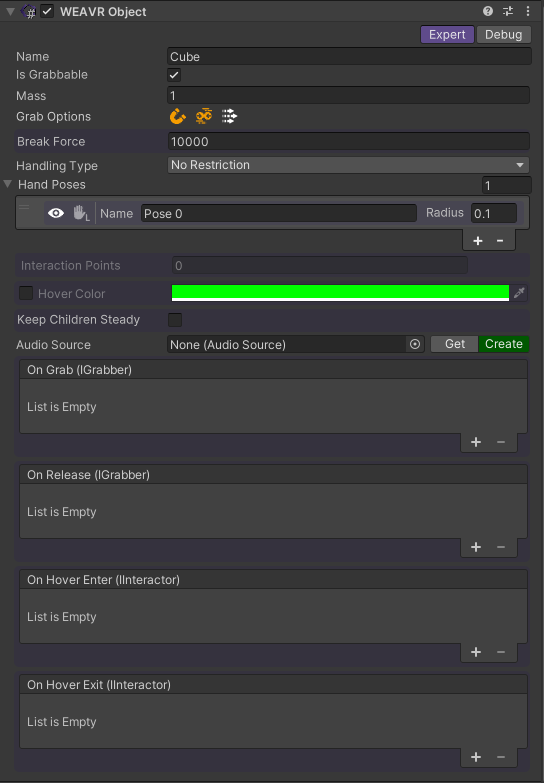
The object's mass affects its behavior when grabbed.
The WEAVR Object component enables you to pick up an object. You need to set the object's layer to Grabbable to grab an object.
| Property | Function |
|---|---|
| Name | Object's name, used to identify the object inside the scene in play mode |
| Is Grabbable | Whether the object can be grabbed or not |
| Mass | Object's mass |
| Grab Options (Enabled by Grabbable option) | Easy Grab = Makes objects easier to grab, although the hand animation will be less precise and sometimes may cause object jittering during grabbing operation. Can Collide = The grabbed object will collide with other objects. Move if Kinematic = The grabbed object will move even if it is kinematic. |
| Break Force | Force needed to lose the object or the grip |
| Handling Type | How you should take the object: No Restriction, One hand, right, left, both hands |
| Hand Poses | Define custom hand poses for your object. View hand in scene. Switch between left/right hand. Radius = hand interaction radius |
| Interaction Points | Interaction Points related to this object. You can change range and short range of it. View and modify range inside the scene. Select this interaction point inside the scene |
| Hover Color | The color to outline the object when hovering it |
| Keep Children Steady | If true, the children interactable objects will stitch to this object |
| Audio Source | Audio Source to be triggered when grabbing the object |
| On Grab / On Release | Unity Events |
Interaction Point
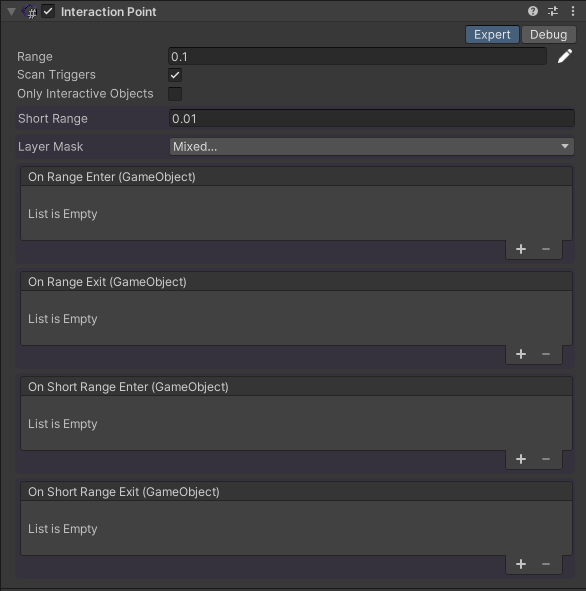
Point of interaction of the object. It can be attached to the main object or to a child.
| Property | Function |
|---|---|
| Range | Range in which you can interact with the object. Edit range with sphere handles inside the scene |
| Scan Triggers | If true, the trigger colliders will be considered when scanning for objects in range |
| Only Interactive Objects | If true, only interaction objects will be considered in range |
| Short Range | A smaller range of interaction |
| Layer Mask | Select the layer of the objects you want to interact with |
| On Range Enter / Exit | Unity Events |
| On Short Range Enter / Exit | Unity Events |
Connectable
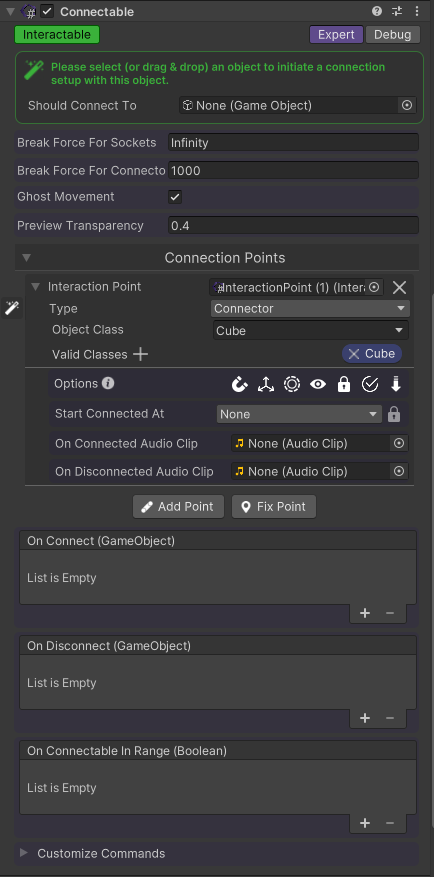
To set up a Connectable you can either:
- Use the wizard by drag and drop the GameObject of your choice in the green box.
- Manually create a Connection Point with Add Point and then setup all its properties.
- Automatically create a Connection Point with Fix Point with default properties: this point will have a "sibling" connectable that will move accordingly. Furthermore, if the object is in range (its label will be yellow) the 2 objects will start connected.
The Connectable component connects two game objects together. To connect successfully, both objects need to have at least a child with an Interaction Point component on it.
| Property | Function |
|---|---|
| Break Force For Sockets | The Force required to break the connection between a socket and a connector. The minimum force will be considered between the two connectables |
| Break Force for Connection | The Force required to break the connection between two connectors. The minimum force will be considered between the two connectables |
| Ghost Movement | If true, this object can move through other objects to reach its destination |
| Preview Transparency | If the preview is enabled, how transparent the previewed object should be |
| Connection Points | Manage the Connection Point (CP) related to this object. Create a new CP by clicking the apposite button and selecting an Interaction Point from the list |
Connection Points Structure
| Field | Function |
|---|---|
| Interaction Point | Each CP has an Interaction Point |
| Type | Whether this connection point is a connector or a socket |
| Object Class | Component tag that connects behaviors. Create a new one by inserting a new name and pressing ENTER key |
| Valid Classes | Select the object that can connect to other objects which have a defined Object Class. Add new one by clicking the [+] on the right corner and selecting a class from the list |
Remove the CP by clicking the [X] next to the Interaction Point.
CP Options
Customize how CP interact with another object (the displayed options depend on the CP type [Socket or Connector]).
| Option | Function |
|---|---|
| AutoConnectInRange | When the "Connector" object is released in range, it will automatically reach the "Socket" and connect |
| AlignAxis | When the "Connector" object should connect, it will automatically align its axis to "Socket's axis" |
| ShortRangeForceConnect | When "Connector" object enters a short range, it forcibly and automatically connects |
| PreviewConnection | The "Connector" object will be previewed as connected when in range |
| LockConnection | Once connected, the object can be disconnected only through a disconnect command |
| IsConnectedInRange | When in range, the connection is considered valid, even if the "Connector" is still grabbed |
| AllowGravity | When "Connector" object is connected, it will become affected by gravity |
| CanSlide | The "Connector" object can slide along a given axis for a given length |
| CanRotate | The "Connector" object can rotate around a given axis for given degrees |
CP Start Connected At [Connector Option]
Object from which the Connection Point will start connected.
| Field | Function |
|---|---|
| Connection | The point which coincides with the connection point |
| Far Point | The point representing the max distance/rotation from the connection point |
| Lock On Start Connected | If true, the movement will be locked once connected at the point |
CP Axis [Socket Option]
This axis is used both for options CanRotate and CanSlide as primary axis (for rotation and movement respectively).
The axis is relative to the Interaction Point.
CP Slide Settings [Socket Option — Enabled by CanSlide]
Define socket's distance and spring force.
| Field | Function |
|---|---|
| Disconnect On Distance | When the Connector reaches the specified point from connection point it can be disconnected |
CP Rotation Settings [Socket Option — Enabled by CanRotate]
Define socket's rotation angle and spring force.
| Field | Function |
|---|---|
| Disconnect On Angle Reached | When the Connector reaches the specified angle from the connection it can be disconnected |
CP On Connect/Disconnect
| Field | Function |
|---|---|
| Audio Clip | Audio On Connect / Disconnect |
| Unity Events | Connect / Disconnect |
| Connect / Disconnect Command | Customize icon and name of the command seen inside WEAVR Player |
The connectable may have an unexpected behavior if the rotation limits are set between [356, 359.9] degrees (and multiples of them).
Executable
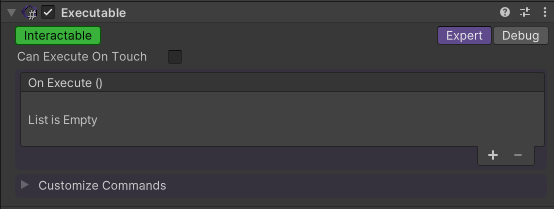
The Executable component triggers generic actions when interacting with the object.
| Property | Function |
|---|---|
| Can Execute on Touch | Touching the object will execute the event |
| On Execute | Unity Event |
| Execute Command | Customize icon and name of the command seen inside the Player |
Door
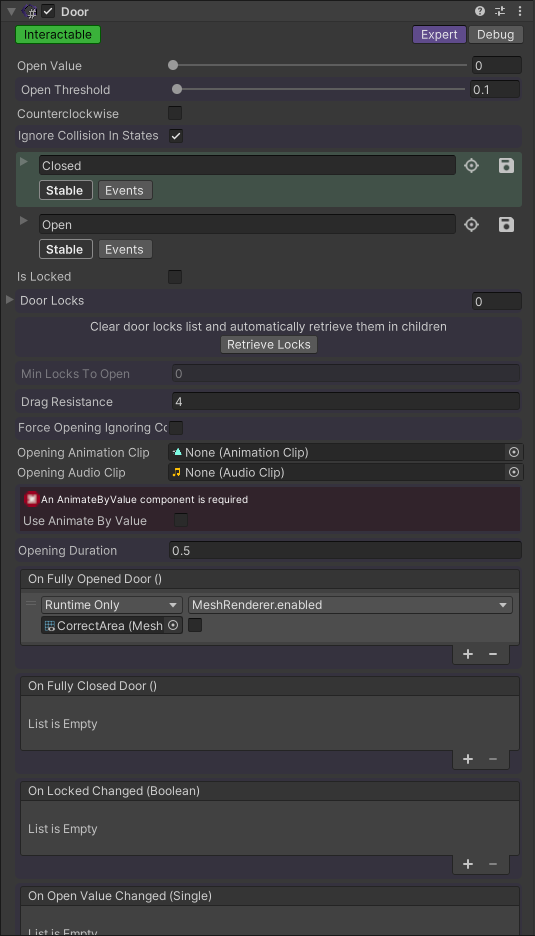
To set up a Door:
- Save the Closed state.
- Move the Door's GameObject to the Open position, then save the state.
This component allows you to simulate different types of doors like a Hinge Door or a Slide Door.
| Property | Function |
|---|---|
| Open Value | How much the door is open |
| Open Threshold | Value above which the door is considered open |
| Counterclockwise | Direction of door rotation |
| Ignore Collision in States | If true, the collisions with colliders in the states will be disabled |
| Closed / Open State | Door's States |
| Is Locked | Whether the door is locked or not |
| Door Locks | Door locks associated to this door |
| Retrieve Locks | Click here to retrieve all children door locks |
| Min Locks to Open | The minimum number of locks needed to unlock the door |
| Drag Resistance | Physical resistance to linear movement or rotation |
| Force Opening | Force open the door |
| Force Opening Ignore Collision | Force Opening Ignoring Colliders is used to avoid collision with other objects while opening during procedure execution |
| Opening Animation Clip | Animation Clip played when opening the door |
| Opening Audio Clip | Audio clip played when opening the door |
| Use Animate by Value | Works with AnimateByValue component and animate your door with it |
| Opening Duration | The time that the door will spend while opening from procedure |
| On Fully Open Door / On Open Door… | Unity Events |
Door Lock
The Door Lock component defines the GameObject as a locking element of a door object. It must be on a Door's child active GameObject. It works with: Executable, Connectable, Push Button, Switch, Knob, and Screwable.
Push Button / Switch: The door lock retrieves the state's names (e.g., LOCKED and UNLOCKED) from the Push Button and Switch interaction. When the interaction is in the LOCKED state, the door is locked; otherwise it is UNLOCKED.
Connectable: The door lock retrieves the two states Connected and Disconnected from the Connectable interaction. When the interaction is in the Connected state, the door is unlocked; otherwise it is locked.
Executable: The door lock retrieves the state of the Executable interaction. When the interaction is executed, it locks and unlocks the object.
Screwable: The door lock retrieves the two states Screwed and Unscrewed from the Screwable interaction. When the interaction is in the Screwed position, the door is locked; otherwise it is unlocked.
Knob: The door lock is based on the value of the Knob interaction. When the knob has a value greater than the threshold the door is locked; otherwise it is unlocked.
Door Lock with Push Button

Door Lock with Connectable

Door Lock with Executable

Door Lock with Screwable

Door Lock with Knob

Push Button
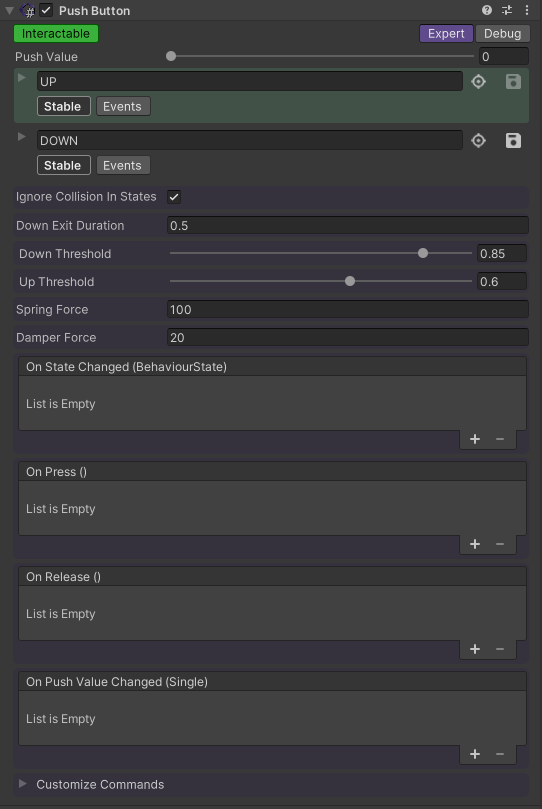
To set up a Push Button:
- Save the Default Position.
- Move the Push Button's GameObject to the Down position, then save the state.
The Push Button component allows you to press the GameObject like a push button.
| Property | Function |
|---|---|
| Push Value | Display the current "pressed" value of the button (how much is pressed) |
| Up / Down State | Button's states |
| Ignore Collision in States | If true, the collisions with colliders in the states will be disabled |
| Down Exit Duration | The time required to press the button to release it from down state |
| Down Threshold | Value above which the button is considered to be in the down state |
| Up Threshold | Value above which the button is considered to be in the up state |
| Spring Force | The spring force to apply when pushing back to Up state |
| Damp Force | The damper force to apply when pushing back to Up state |
| On Press / Release / Push Value Changed | Unity Events |
| Customize Commands | Customize icon and name of the command seen inside the Player |
Switch
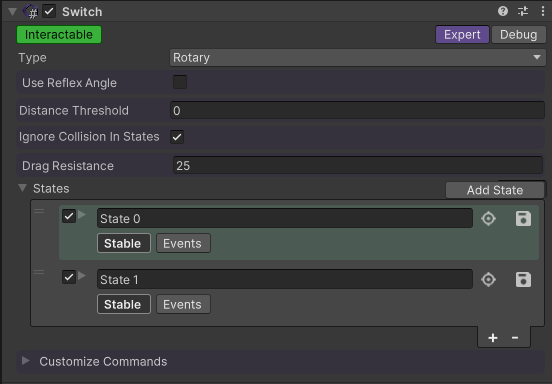
To set up a Switch:
- Save the Default Position.
- Choose the Switch's type.
- Add a new state, move the GameObject to the desired position/rotation, save the state.
The Switch component allows you to interact with the GameObject like a switch.
| Property | Function |
|---|---|
| Type | The switch's type: Rotary or Linear |
| Use Reflex Angle | Whether your angle will be >180 degrees (Enabled by Rotary Switch) |
| Distance Threshold | Distance threshold for state transition |
| Ignore Collision in States | If true, the collisions with colliders in the states will be disabled |
| Drag Resistance | Physical resistance to linear movement or rotation |
| States | Switch States. Click on "Add state" to create a new state. You can enable/disable them or even reorder them |
Knob
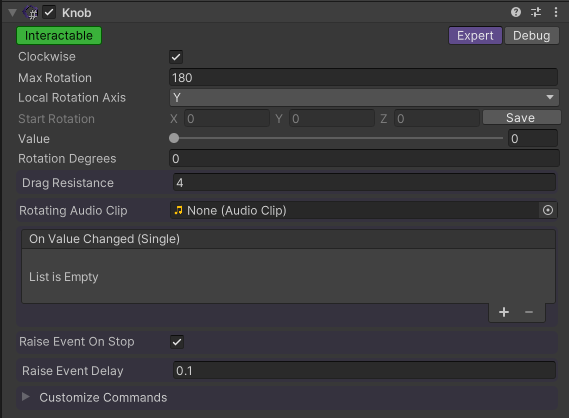
To set up a Knob:
- Save the Start Rotation.
- Choose the Max Rotation and the Local Axis.
The Knob component allows you to interact with the GameObject like a knob.
| Property | Function |
|---|---|
| Clockwise | Direction of rotation |
| Max Rotation | Maximum degrees of rotation the knob can perform starting from the initial rotation |
| Local Rotation Axis | Local rotation axis for the knob |
| Start Rotation | Initial rotation of the knob. Use the START button to save the rotation |
| Value | Current normalized rotation value |
| Rotation Degrees | Current rotation degrees |
| Drag Resistance | Physical resistance to rotation |
| Rotating Audio Clip | Audio clip that will play while rotating |
| On Value Changed | Unity Event |
| Raise Event On Stop | The event will be raised when the knob has stopped rotating and has assumed the new value |
| Raise Event Delay | Delay with which the event is launched after the stop |
Screwable
The Screwable component allows you to interact with the GameObject like a Screwable. Taking a screw to be tightened with a screwdriver as an example, we can identify 3 components:
- Screwable Tool — represents the tool, so the screwdriver.
- Screwable Hole — represents the hole where the screw will be inserted.
- Screwable Object — represents the screw.
Screwable Tool
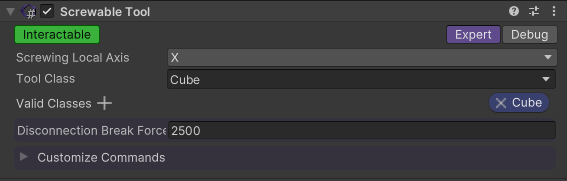
| Property | Function |
|---|---|
| Screwing Local Axis | Rotation axis for screwing relative to the interaction point |
| Tool Class | Screwable tool class |
| Valid Classes | Classes of screwables this tool can interact with |
| Disconnection Break Force | Force needed to break the connection |
Screwable Hole

| Property | Function |
|---|---|
| Valid Screwable Class | Align the closest screwable of chosen class |
| Fix the interaction point position according to unscrewed position of the closest screwable |
Screwable Object
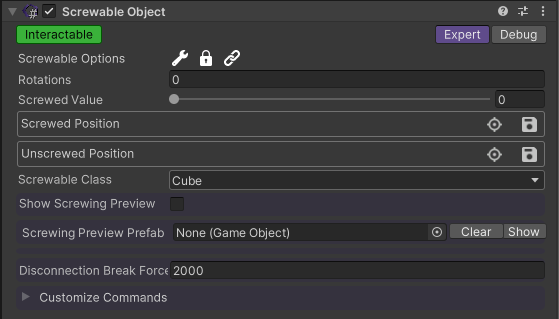
| Property | Function |
|---|---|
| Screwable Options | Tool Needed = The object can only be screwed using a tool. Is Captive = The object is captive; it cannot be disconnected from its hole. Start Connected = When the game starts, the object is connected to the closest hole. |
| Rotations | Number of 360-degree rotations to screw the object |
| Screwed Value | Normalized screwing value. If a value is set before connection, the screwable will automatically reach that value on first connection |
| Screwed Position | Screwable state |
| Unscrewed Position | Screwable state |
| Screwable Class | Class of this object |
| Show Screwing Preview | Show preview prefab when screwing an object |
| Screwing Preview Prefab | The preview prefab |
| Disconnection Break Force | Force needed to break connection |